Vehicle Routing Profiles
Use Vehicle Routing Profiles when Azure Maps should calculate routes with truck restrictions.
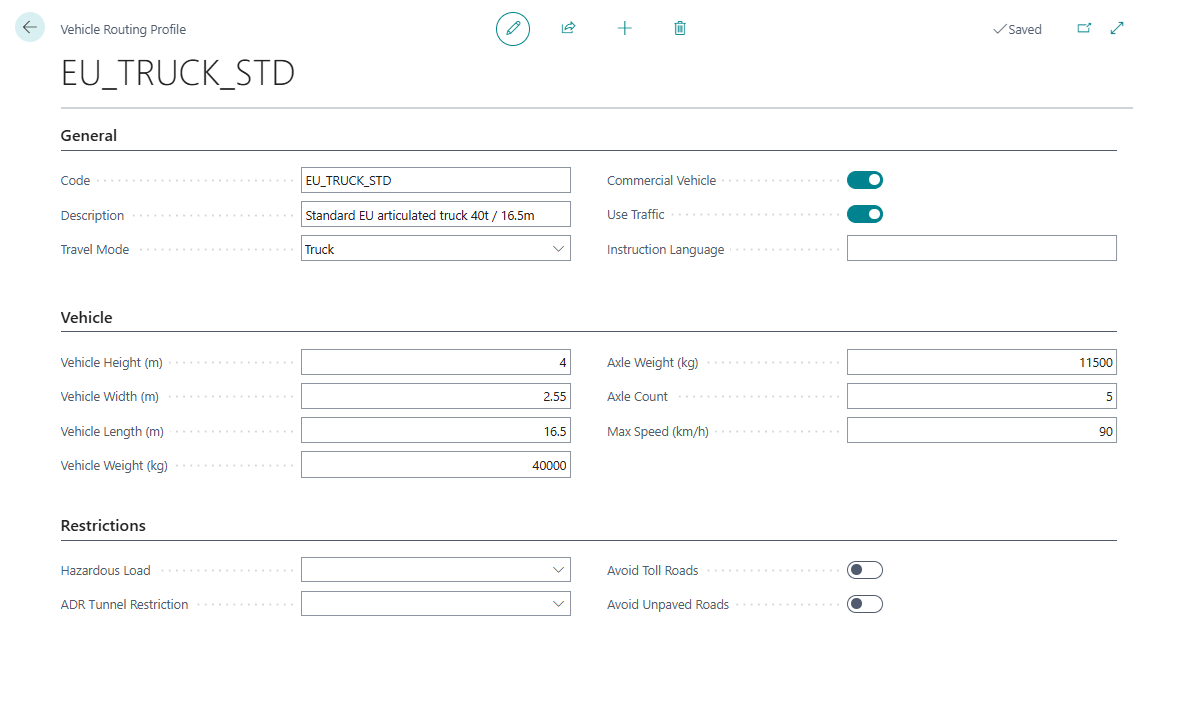
A routing profile can describe:
- travel mode,
- commercial vehicle flag,
- vehicle dimensions,
- weight,
- axle weight,
- hazardous-load category,
- ADR tunnel restriction,
- road features to avoid,
- traffic usage,
- route instruction language.
Field reference
| Field | What it means | When to use it |
|---|---|---|
| Travel Mode | Provider travel mode requested for the route | Set this for normal car or truck routing behavior |
| Commercial Vehicle | Marks the route as commercial vehicle routing | Use for truck-aware planning in Azure Maps |
| Vehicle Height (m) | Legal vehicle height | Use when bridges or road restrictions matter |
| Vehicle Width (m) | Legal vehicle width | Use for narrow-road restrictions |
| Vehicle Length (m) | Legal vehicle length | Use for turning and road-access restrictions |
| Vehicle Weight (kg) | Gross vehicle weight | Use for road, bridge, and legal restrictions |
| Axle Weight (kg) | Maximum axle weight | Use when axle-weight restrictions apply |
| Axle Count | Number of axles | Use when provider routing differentiates by axle count |
| Max Speed (km/h) | Vehicle maximum speed | Use when travel-time estimates should reflect equipment limits |
| Hazardous Load | Hazardous or regulated load class | Use for hazmat-aware routing |
| ADR Tunnel Restriction | ADR tunnel category | Use for European tunnel restrictions |
| Avoid Toll Roads | Avoid toll roads where possible | Use when toll avoidance is part of policy or quoting |
| Avoid Unpaved Roads | Avoid unpaved roads where possible | Use for fragile cargo or equipment restrictions |
| Use Traffic | Use traffic-aware duration when supported | Use for more realistic duration estimates |
| Instruction Language | Language code for route instructions | Use when drivers or documents need localized route guidance |
Before you start
- Configure Azure Maps Integration.
- Confirm that Map Provider is Azure Maps in TMS Setup.
- Review your equipment types and restrictions.
Create default profiles
- Search for Vehicle Routing Profiles.
- Choose Set Default Vehicle Routing Profiles.
- Review the created profiles.
- Adjust dimensions, weight, hazardous-load, and avoid settings to match your fleet.
Assign a profile to a unit type
- Open Logistic Unit Types.
- Open the unit type that represents the vehicle or equipment profile.
- Fill Vehicle Routing Profile Code.
- Review dimensions and maximum weight.
- Save the record.
Use the profile on a route calculation
- Use a vehicle or unit type that has a routing profile.
- Add it to a Transport Order.
- Run Get Transport Time & Distance or a route action.
- Review the calculated route.

Example: avoid a route that is not suitable for the truck
A dispatcher plans a delivery with a tall, heavy truck.
- Create a vehicle routing profile with the truck’s height, weight, axle count, and any hazardous-load rules.
- Assign that profile to the logistic unit type used by the vehicle.
- Use Azure Maps as the map provider.
- Recalculate the route on the Transport Order.
Expected result:
- Azure Maps receives truck-related restrictions during route calculation;
- the returned route and duration can differ from a normal passenger-car route;
- planners can review the route before releasing the Transport Order.
Good to know
- Vehicle routing profiles are used with Azure Maps truck-aware routing.
- Google Maps setup does not use these truck-specific profile fields in the same way.
- Changing a profile can make stored route-distance values outdated.
- Recalculate route distance and duration after changing a routing profile.
- Route results still depend on what the selected map provider supports for your region.